
composition API
setup
在setup中应该避免使用this,因为this不指向组件实例
setup函数参数
- 参数1: props
props就是父组件传递过来的属性,会被放到props对象中,如果需要在setup中使用,需要配合props配置项,通过props参数获取- 定义props的类型,还是在props配置项中定义
- 且在template中依然是可以正常去使用props中的属性
- 在setup函数中想要使用props,不可以通过 this 去获取,直接通过参数使用即可
- 参数2: context
context包含三个属性attrs:所有未在props中接收的属性slots:父组件传递过来的插槽emit:调用父组件方法时用到的emit
1
2
3
4
5
6
7
8
export default {
props: {
name: String
},
setup(props, { attrs, slots, emit }){
...
}
}
setup函数的返回值
- setup的返回值可以在模板template中被使用,也就是说我们可以通过setup的返回值来替代data选项
- 可以返回一个执行函数来代替在methods中定义的方法
1 | <template> |
setup不可以使用this
- 表达的含义是this并没有指向当前组件实例
- 并且在setup被调用之前,data、computed、methods等都没有被解析
- 所以无法在setup中获取this
setup中使用ref
- 只需要定义一个ref对象,绑定到元素或者组件的ref属性上即可
1 | <template> |
Reactive API
- 如果想为在setup中定义的数据提供响应式的特性,那么我们可以使用reactive的函数
1
2
3
4let state = reactive({
name: 'TT',
age: 18
}) - 原因
- 这是因为当我们使用reactive函数处理我们的数据之后,数据再次被使用时就会进行依赖收集
- 当数据发生改变时,所有收集到的依赖都是进行对应的响应式操作(比如更新界面)
- 事实上,我们编写的data选项,也是在内部交给了 reactive函数 将其编成响应式对象的
- 限制
reactive要求我们必须传入的是一个对象或数组类型,如果传入 基本数据类型(String, Number, Boolean)会报一个警告:
**value cannot be made reactive: *****
Ref API
- ref 会返回一个可变的响应式对象, 该对象作为一个 响应式的引用 维护着它内部的值,这就是ref名称的来源
- 它内部的值是在ref的value 属性中被维护的
1
2let message = ref("Hello World")
console.log(message.value) -> 'Hello World' - 注意事项:
- 在模板中引入ref的值时,Vue会自动帮助我们进行解包操作,所以我们并不需要在模板中通过ref.value的方式来使用
- 但是在setup 函数内部,它依然是一个ref引用,所以对其进行操作时,我们依然需要使用ref.value的方式
ref自动解包
- 模板中的解包是浅层解包,如果把ref对象放到一个普通对象内部,在模板中使用时将不会自动解包
1
2
3
4
5
6
7
8
9
10
11
12
13
14
15
16
17
18
19
20
21
22
23<template>
<div>
<h2> {{ message }} </h2>
<h2> {{ info.message.value }} </h2>
</div>
</template>
<script>
import { ref } from 'vue';
export default {
setup(){
let message = ref('Hello World');
let info = {
message
}
return {
message,
info
}
}
}
</script> - 如果我们将ref放到一个reactive的属性当中,那么在模板中使用时,它会自动解包
1
2
3
4
5
6
7
8
9
10
11
12
13
14
15
16
17
18
19
20
21
22
23<template>
<div>
<h2> {{ message }} </h2>
<h2> {{ info.message }} </h2>
</div>
</template>
<script>
import { ref, reactive } from 'vue';
export default {
setup(){
let message = ref('Hello World');
let info = reactive({
message
})
return {
message,
info
}
}
}
</script>
readonly
- 何时使用?
- 通过
reactive或者ref可以获取到一个响应式对象,但如果希望传递给某些组件使用,并且不允许修改时
- 通过
readonly会返回原生对象的只读代理(也就是它依然是一个Proxy,这是一个proxy的set方法被劫持,并且不 能对其进行修改)- 在开发中常见的
readonly方法会传入三个类型的参数- 类型一:普通对象
- 类型二:
reactive返回的对象 - 类型三:
ref的对象
readonly的使用readonly返回的对象都是不允许修改的- 经过
readonly处理的原来的对象允许修改,当原对象改变时,readonly返回的对象也会被修改 - 本质上就是
readonly返回的对象的setter方法被劫持了而已
Reactive判断的API
- isProxy
- 检查对象是否是由reactive 或readonly创建的proxy
- isReactive
- 检查对象是否是由reactive创建的响应式代理
- 如果该代理是readonly创建的,但包裹了由reactive 创建的另一个代理,它也会返回true
- isReadonly
- 检查对象是否是由readonly创建的只读代理
- toRaw
- 返回reactive 或readonly代理的原始对象(不建议保留对原始对象的持久引用。请谨慎使用)
- shallowReactive
- 创建一个响应式代理,它跟踪其自身property 的响应性,但不执行嵌套对象的深层响应式转换(深层还是原生对象)
- shallowReadonly
- 创建一个proxy,使其自身的property 为只读,但不执行嵌套对象的深度只读转换(深层还是可读、可写的)
toRefs
- 如果我们使用ES6的解构语法,对reactive返回的对象进行解构获取值,那么之后无论是修改解构后的变量,还是修改reactive返回的state对象, 数据都不再是响应式的
1
2
3
4
5
6let info = reactive({
name: 'TT',
age: 18
})
let { name, age } = info - 解决办法
- Vue为我们提供了一个toRefs的函数,可以将reactive返回的对象中的属性都转成ref
- 那么我们再次进行解构出来的name 和age 本身都是ref的
1
2// 当我们这样写的时候,会返回两个ref对象,他们都是响应式的
let { name, age } = toRefs(info)
- 这种做法相当于已经在info.name和ref.value之间建立了链接,任何一个修改都会引起另外一个变化
toRef
- 如果只希望转换一个reactive对象中的属性为ref, 那么可以使用toRef方法
1
2let name = toRef(info, 'name');
const changeName = () => info.name = 'zs'
ref的其他API
- unref
- 如果我们想要获取一个ref引用中的value,可以通过unref方法
- 如果参数是一个ref,则返回内部值,否则返回参数本身
- 这是val= isRef(val) ? val.value: val的语法糖函数
- isRef
- 判断值是否是一个ref对象
- shallowRef
- 创建一个浅层的ref对象
- triggerRef
- 手动触发和shallowRef相关联的副作用
1
2
3
4
5
6
7let info = shallowRef({ name: 'tt' })
// 下面的修改不是响应式的
const changeInfo = () => {
info.value.name = 'zs'
// 手动触发
triggerRef(info)
}
- 手动触发和shallowRef相关联的副作用
customRef
- 创建一个 自定义的ref,并对其依赖项跟踪和更新触发进行显式控制
- 它需要一个工厂函数,该函数接收track 和trigger 函数作为参数
- 并且应该返回一个带有get 和set 的对象
- 对双向绑定属性进行debounce(节流)的案例:使用方式
1
2
3
4
5
6
7
8
9
10
11
12
13
14
15
16
17
18
19
20import { customRef } from 'vue';
export function useDebouncedRef(value, delay = 200) {
let timeout;
return customRef( (track, trigger) => {
return {
get(){
track();
return value
},
set(newValue){
clearTimeout(timeout);
timeout = setTimeout( () => {
value = newValue;
trigger()
}, delay)
}
}
})
}1
2
3
4
5
6
7
8
9
10
11
12
13
14
15
16
17
18<template>
<div>
<input v-model="msg" />
<h2> {{msg}} </h2>
</div>
</template>
<script>
import { useDebouncedRef } from '@/hooks/useDebounceRef';
export default {
setup(){
let msg = useDebouncedRef('Hello World')
return {
msg
}
}
}
</script>
computed
- 当我们的某些属性是依赖其他状态时,可以使用计算属性来处理
- 在前面的Options API中,我们是使用computed选项来完成的
- 在Composition API中,我们可以在setup 函数中使用computed 方法来编写一个计算属性
- 用法
- 方式一:接收一个getter函数,并为getter函数返回的值,返回一个不变的ref 对象
1
2
3
4import { computed } from 'vue'
const fullName = computed( ()=>{
return firstName.value + ' ' + lastName.value
}) - 方式二:接收一个具有get和set的对象,返回一个可变的(可读写)的ref对象
1
2
3
4
5
6
7
8
9
10const fullName = computed({
get: () => {
return firstName.value + ' ' + lastName.value
},
set: newValue => {
const names = newValue.split(" ");
firstName.value = names[0];
lastName.value = names[1]
}
})
- 方式一:接收一个getter函数,并为getter函数返回的值,返回一个不变的ref 对象
侦听数据的变化
- 在前面的Options API中,我们可以通过watch选项来侦听data或者props的数据变化,当数据变化时执行某一些操作
- 在Composition API中,我们可以使用watchEffect和watch来完成响应式数据的侦听
- watchEffect用于自动收集响应式数据的依赖
- watch需要手动指定侦听的数据源
watchEffect
watchEffect用法
- 当侦听到某些响应式数据变化时,我们希望执行某些操作,这个时候可以使用watchEffect
- 看一个案例
- 首先,watchEffect传入的函数会被立即执行一次,并且在执行的过程中会收集依赖
- 其次,只有收集的依赖发生变化时,watchEffect传入的函数才会再次执行
1
2
3
4
5
6let name = ref('tt');
let age = ref(18);
watchEffect( ()=>{
console.log('watchEffect执行', name.value, age.value)
})
watchEffect的停止侦听
- 如果在发生某些情况下,我们希望停止侦听,这个时候我们可以获取watchEffect的返回值函数,调用该函数即可
- 比如在上面的案例中,我们age达到20的时候就停止侦听
1
2
3
4
5
6
7
8
9
10const stopWatch = watchEffect( ()=>{
console.log('watchEffect执行', name.value, age.value)
})
const changeAge = () => {
age.value++
if(age.value > 20){
stopWacth()
}
}
watchEffect清除副作用
- 什么是清除副作用呢?
- 比如在开发中我们需要在侦听函数中执行网络请求,但是在网络请求还没有达到的时候,我们停止了侦听器,或者侦听器侦听函数被再次执行了
- 那么上一次的网络请求应该被取消掉,这个时候我们就可以清除上一次的副作用
- 在我们给watchEffect传入的函数被回调时,其实可以获取到一个参数:onInvalidate
- 当副作用即将重新执行或者侦听器被停止时会执行该函数传入的回调函数
- 我们可以在传入的回调函数中,执行一些清除工作
1
2
3
4
5
6
7
8
9const stopWatch = watchEffect( (onInValidate) => {
console.log('watchEffect执行', name.value, age.value)
const timer = setTimeout( ()=>{
console.log('2s后执行的操作')
}, 2000);
onInvalidate( ()=>{
clearTimeout(timer)
})
})
watchEffect的执行时机
- 默认情况下,组件的更新会在副作用函数执行之前
- 能不能在副作用函数中获取到元素呢?
1
2
3
4
5
6
7
8
9
10
11
12
13
14
15
16
17
18
19
20export default {
setup(){
const titleRef = ref(null);
const count = 0;
watchEffect( ()=>{
console.log(titleRef.value)
})
return {
titleRef,
count
}
}
}
/**
* log:
* > null
* > <h2></h2>
*/
- 能不能在副作用函数中获取到元素呢?
- 我们会发现打印结果打印了两次
- 这是因为setup函数在执行时就会立即执行传入的副作用函数,这个时候DOM并没有挂载,所以打印为null
- 而当DOM挂载时,会给title的ref对象赋值新的值,副作用函数会再次执行,打印出来对应的元素
调整watchEffect的执行时机
- 如果我们希望第一次执行时就能打印出对应的元素
- 这个时候我们需要改变副作用函数的执行时机
- 它的默认值是pre,它会在元素挂载或者更新之前执行
- 所以我们会先打印出来一个空的,当依赖的title发生改变时,就会再次执行一次,打印出元素
- 设置副作用函数的执行时机
watchEffect的第二个参数{ flush: '' }flush可选值:pre、post,syncpre:默认。挂载前、更新前post:将推迟副作用函数的初始运行,直到组件的首次渲染完成才会执行sync:将强制效果始终同步触发。然而,这是低效的,应该很少需要1
2
3
4
5
6
7let h2ElContent = null;
watchEffect( ()=>{
h2ElContent = titleRef.value && titleRef.value.textContent
console.log(h2ElContent, count.value)
}, {
flush: 'post'
})
watch
watch的使用
- watch的API完全等同于组件watch选项的Property:
- watch需要侦听特定的数据源,并在回调函数中执行副作用
- 默认情况下它是惰性的,只有当被侦听的源发生变化时才会执行回调
- 与watchEffect的比较,watch允许我们
- 懒执行副作用(第一次不会直接执行)
- 更具体的说明当哪些状态发生变化时,触发侦听器的执行
- 访问侦听状态变化前后的值
侦听单个数据源
watch侦听的数据源有两种类型:
- 一个getter函数: 但是该getter函数必须引用可响应式的对象(ref或reactive)
1
2
3
4const info = reactive({name: 'TT', age: 18})
watch( () => info.name, (newVal, oldVal)=>{
console.log('new:', newVal, 'old:', oldVal);
}) - 侦听响应式对象,
reactive或者ref(比较常用的是ref)1
2
3
4// 情况一: reactive对象获取到的newValue和oldValue本身都是 reactive对象
watch(info, (newVal, oldVal)=>{
console.log('new:', newVal, 'old:', oldVal);
})
1
2
3
4
5
6// 如果希望newValue和oldValue是一个普通的对象,可以使用扩展运算符
watch(()=> {
return {...info}
}, (newVal, oldVal)=>{
console.log('new:', newVal, 'old:', oldVal);
})- 一个getter函数: 但是该getter函数必须引用可响应式的对象(ref或reactive)
侦听多个数据源
1 | const name = ref('TT') |
侦听响应式对象
监听到的对象为reactive对象
2
3
console.log('new:', newInfo, 'old:', oldInfo);
})
如果希望监听到的对象或数组为普通对象,可以使用一个getter函数,并且对可响应对象进行解构
2
3
4
watch(()=>([...arr]), (newArr, oldArr)=>{
console.log('new:', newArr, 'old:', oldArr);
}
watch的选项
- 如果想进行深层侦听,需要在
watch的第三个对象参数设置deep为true - 如果想立即执行一次
watch,也可以传入immediate1
2
3
4
5
6
7
8
9
10
11
12
13
14
15
16
17
18const info = reactive({
name: 'TT',
age: 18,
friend: {
name: 'ls'
}
})
// 需要用小括号包裹
watch( ()=>({...info}) , (newInfo, oldInfo)=>{
console.log('new:', newInfo, 'old:', oldInfo);
},{
deep: true,
immediate: true
})
const changeData = () =>{
info.name = 'zs'
}
生命周期钩子
使用直接导入的 onXXX 函数注册生命周期钩子,这些函数接受一个回调函数,当钩子被组件调用时将会被执行
1 | import { onMounted, onUpdated, onUnmounted } from 'vue' |
| 选项式API | Hook inside setup |
|---|---|
beforeCreate |
Not needed* |
created |
Not needed* |
beforeMount |
onBeforeMount |
mounted |
onMounted |
beforeUpdate |
onBeforeUpdate |
updated |
onUpdated |
beforeDestroy |
onBeforeUnmount |
destroyed |
onUnmounted |
activated |
onActivated |
deactivated |
onDeactivated |
TIP
因为setup是围绕beforeCreate和created生命周期钩子运行的,所以不需要显式地定义它们。换句话说,在这些钩子中编写的任何代码都应该直接在setup函数中编写。
1 | created(){ |
hook的使用
实现一个监听界面滚动位置的Hook
1 | import { ref } from 'vue'; |
实现一个使用localStorage存储和获取数据的Hook
1 | import { ref, watch } from 'vue' |
用法
1 | import { useScrollPosition, useLocalstorage } from './hooks' |
单文件组件<script setup>
基本用法
里面的代码会被编译成组件
setup()函数的内容。这意味着与普通的<script>只在组件被首次引入的时候执行一次不同,<script setup>中的代码会在每次组件实例被创建的时候执行。import引入的内容也可以直接在模板中使用
1 | <template> |
响应式
响应式状态需要明确使用响应式 APIs 来创建。和从
setup()函数中返回值一样,ref 值在模板中使用的时候会自动解包
1 | <template> |
使用组件
1 | <template> |
动态组件
由于组件被引用为变量而不是作为字符串键来注册的,在
<script setup>中要使用动态组件的时候,应该使用动态的:is来绑定
1 | <template> |
defineProps 和 defineEmits
在
<script setup>中必须使用defineProps和defineEmitsAPI 来声明props和emits
父组件
1 | <template> |
子组件
1 | <template> |
h函数
h() 函数是一个用于创建 vnode 的一个函数,需要从vue导入
- h( tag[, props, children] )
tag: 必需 ,参数类型{ String | Object | Function },HTML标签名、组件、函数式组件props: 可选,参数类型{ object },给元素绑定事件或元素children: 可选,参数类型{ string | array | object }, 子VNode,使用h()构建,可直接传递字符串或者有插槽的对象
基本用法
h函数可以在两个地方使用:
render函数选项中;setup函数选项中(setup本身需要是一个函数类型,函数再返回h函数创建的VNode1
2
3
4
5
6
7
8
9
10
11
12
13
14
15
16
17
18
19
20
21
22
23
24
25
26
27import { ref, h } from "vue";
export default {
data(){
return {
count: 0
}
}
// —————————————————————data、setup 都可使用——————————————————————
setup(){
const count = ref(0)
return {
count
}
}
render(){
return h('div', { class: 'app' }, [
h('h2', null, `当前计数:${this.count}`),
h('button', {
onClick: () => this.count ++
}, '+1'),
h('button', {
onClick: () => this.count --
}, '-1')
])
}
}
在setup中使用render
1 | import { ref, h } from "vue"; |
传递props参数
父组件
1 | import { h } from 'vue' |
子组件
1 | export default { |
函数式组件和插槽的使用
父组件
1 | import { ref, h } from "vue"; |
子组件
1 | render(){ |
自定义指令
指令的生命周期
created:在绑定元素的attribute 或事件监听器被应用之前调用beforeMount:当指令第一次绑定到元素并且在挂载父组件之前调用mounted:在绑定元素的父组件被挂载后调用beforeUpdate:在更新包含组件的VNode之前调用updated:在包含组件的VNode及其子组件的VNode更新后调用beforeUnmount:在卸载绑定元素的父组件之前调用unmounted:当指令与元素解除绑定且父组件已卸载时,只调用一次
每个生命周期钩子 都可以接受到 4个参数 el, bindings, vnode, preVnode
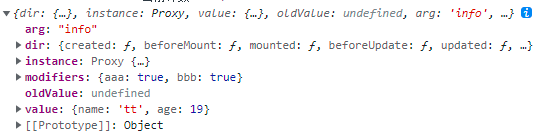
指令的参数和修饰符
- 如果自定义指令需要接收一些参数或者修饰符
<button v-tt:info.aaa.bbb="{name: 'tt', age: 19}">click me</button> - 在指令的生命周期中,我们可以通过 bindings 获取到对应的内容
封装时间格式化的指令 v-format-time
**使用时秩序调用该函数,并将app传入即可
1 | import dayjs from 'dayjs' |
Vue插件
- 通常我们向Vue全局添加一些功能时,会采用插件的模式,它有两种编写方式:
- 对象类型:一个对象,但是必须包含一个install 的函数,该函数会在安装插件时执行
- 函数类型:一个function,这个函数会在安装插件时自动执行
- 插件可以完成的功能没有限制!
- 添加全局方法或者property,通过把它们添加到config.globalProperties上实现
- 添加全局资源:指令/过滤器/过渡等
- 通过全局mixin来添加一些组件选项
- 一个库,提供自己的API,同时提供上面提到的一个或多个功能
1
2
3
4
5
6
7
8
9
10// 对象类型写法
export default {
install(app, options) {
console.log('插件被安装:', app, options)
}
}
// 函数类型写法
export default function(app, options) {
console.log('插件被安装:', app, options)
}
JSX
部分语法
1 | const arr = [a,b,c,d,e] |
jsx计数器案例
1 | export default { |
jsx组件和插槽的使用
父组件
1 | import HelloWorld from 'HelloWorld.vue' |
子组件
1 | export default { |
组件间通信
父子组件通信
- 父组件传递给子组件:通过props属性
使用
v-bind传递给子组件,子组件使用Props接收 - 子组件传递给父组件通过$emit触发事件
需要在子组件中写入一个新的配置项
emits接收父组件传递的事件名称1
2
3
4
5
6
7
8
9
10
11
12
13
14
15
16
17
18
19
20
21
22
23
24// 父组件
<template>
<div>
<child @increment='increment' @decrement='decrement'></child>
</div>
</template>
...
// 子组件
<script>
export default {
emits: [ 'increment', 'decrement' ],
setup(props, { attrs, slots, emit }){
addOne(){
emit.increment()
}
subOne(){
emit.decrement()
}
}
}
</script>
非父子组件的通信
provide和inject
- Provide/Inject用于非父子组件之间共享数据
- 比如有一些深度嵌套的组件,后代组件想要获取祖先组件的部分内容
- 在这种情况下,如果我们仍然将props沿着组件链逐级传递下去,就会常的麻烦
- 这种情况下,可以使用Provide 和Inject
- 无论层级结构有多深,祖先组件都可以作为其所有后代组件的依赖提供者
- 父组件有一个
provide函数来提供数据 - 子组件有一个
inject函数来接收这些数据
Provide函数
- 可以通过
provide方法定义每个Property provide接收两个参数- key: 提供的属性名称(后代组件接收时的名称)
- value:提供的属性值
1
2
3
4
5
6
7
8import { provide } from 'vue'
let count = 100;
let info = {
name: 'TT',
age: 18
}
provide('counter', count)
provide('info', info)
Inject函数
- 在后代组件 中可以通过
inject来注入需要的属性和对应的值 inject可以传入两个参数- key:要接收的属性的key
- defaultValue:默认值(可不传)
1
2let name = inject('name')
let info = inject('info')
provide/inject 的响应式
- 为了增加
provide值和inject值之间的响应性,可以在provide值时使用ref和reactive - 未防止后代组件修改值,可在
provide传递时使用readonly1
2
3
4
5
6
7
8let name = ref('TT');
let info = reactive({
name: 'TT',
age: 18
});
provide('name', readonly(name))
provide('info', readonly(info)) - 后代组件需要修改
inject接收到的值时,要遵守单向数据流原则,可以将修改的方法在祖先组件中定义,在后代组件中调用1
2
3
4
5
6
7
8
9
10
11
12/***** 祖先组件 *******/
let name = ref('TT');
const changeName = () => { name.value = 'zs' }
provide('name', readonly(name))
provide('changeName', changeName)
/***** 后代组件 *******/
let changeName = inject('changeName')
const emitChangeName = () => {
changeName()
}
全局事件总线mitt库
- Vue3从实例中移除了$on、$off 和$once 方法,所以我们如果希望继续使用全局事件总线,要通过第三方的库
- Vue3官方有推荐一些库,例如mitt或tiny-emitter
- 封装一个通信工具库
eventbus.js:1
2
3import mitt from 'mitt';
const emitter = mitt();
export default emitter; - 使用方式
监听
1 | import emitter from './eventBus'; |
触发事件总线
1 | import emitter from './eventBus' |
取消监听
1 | // 取消所有监听 |
路由
vue3中路由的使用
1 | import { createRouter, createWebHashHistory, createWebHistory } |
路由的重定向
使用
redirect可以让路径默认跳转到某个页面
1 | { path: '/', redirect: '/home' }, |
路由懒加载
把不同路由对应的组件分割成不同的代码块,然后当路由被访问的时候才加载对应组件, 也可以提高首屏的渲染效率
- 原理还是webpack的分包,VueRouter支持动态倒入组件
component可以传入一个组件,也可以接受一个函数,但是函数必须返回一个Promise,import函数返回的就是一个Promise1
2
3
4
5const routes = [
{ path: '/home', component: () => import('../pages/Home.vue') }
// 这里可以自己定义打包后分包的文件名称
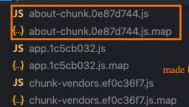
{ path: '/about', component: () => import(/* webpackChunkName: "about-chunk" */'../pages/About.vue') }
]分包前

分包后
动态路由基本匹配
- 路径参数
1
2
3
4
5
6
7
8
9{
path: '/user/:uid',
component: () => import('../pages/User.vue')
},
{
path: '/details/:cid'
}
// 跳转
<router-link to="/user/10021"></router-link>
NotFound
- 对于那些没有匹配到的路由,通常会匹配到固定的
NorFound页面1
2
3
4
5
6{
path: '/:pathMatch(.*)',
component: () => import('../pages/NotFound.vue')
}
// NotFound组件内获取参数
this.$route.params.pathMatch - 匹配规则加*
1
2
3
4{
path: '/:pathMatch(.*)*',
component: () => import('../pages/NotFound.vue')
} - 区别在于是否解析 ‘/‘:
/:pathMatch(.*): $route.params.pathMatch =>/user/123/123/123/:pathMatch(.*)*: $route.params.pathMatch =>['user', '123', '123']
路由嵌套
- 例如Home、About、User等都属于一级路由,现在在它们之间可以来回进行切换
- 但如果Home页面本身,也可能会在多个组件之间来回切换
- 比如Home中包括Product、Message,它们可以在Home内部来回切换
- 这个时候就需要使用嵌套路由,在Home中也使用router-view 来占位之后需要渲染的组件
1
2
3
4
5
6
7
8
9
10
11
12
13
14
15
16
17
18
19{
path: '/home',
name: 'home',
component: () => import('../pages/Home.vue'),
meta: {
name: 'home',
title: '首页',
},
children: [
{
path: 'message',
component: () => import('../pages/HomeMessage.vue')
},
{
path: 'shops',
component: () => import('../pages/HomeShops.vue')
},
]
},
router-link的v-slot
- 在vue-router3.x的时候,
router-link有一个tag属性,可以决定 router-link渲染后的元素- 在vue-router4.x
tag属性被移除 - 新增了
v-slot,可以更灵活的定制渲染的内容
- 在vue-router4.x
- v-slot的使用
- 需要使用
custom来表示整个元素需要自定义, 如果不写,自定义的内容会被包裹在一个a元素中 - 使用
v-slot来作用域插槽来获取内部传给我们的值:href: 解析后的URL,route: 解析后的规范化的 route 对象navigate: 触发导航的函数isActive:当前是否处于活跃状态isExactActive:是否是精准匹配的状态
- 需要使用
1 | <router-link to="/home" v-slot="{ href, route, navigate, isActive, isExactActive }"> |
router-view的v-slot
- router-view也提供给我们一个插槽,可以用于
和 组件来包裹你的路由组件 Component: 要渲染的组件route: route对象
动态添加/删除路由
- 动态添加路由 使用
addRoute- 添加一级路由(传递一个路由配置对象)
1
2
3
4
5const route1 = {
path: '/route1',
component: () => import('../..')
}
router.addRoute(route1) - 添加子级路由(需传递父级路由的name,路由配置对象)
1
2
3
4
5const route2 = {
path: '/route2',
component: () => import('../..')
}
router.addRoute('home', route2)
- 添加一级路由(传递一个路由配置对象)
- 动态删除路由 (三种方式)
- 方式一: 添加一个相同 name 的路由
1
2
3router.addRoute({ path: '/about', name: 'about', component: About })
// 这会删除掉 about,因为他们 name 相同, 但 name 必须是唯一的
router.addRoute({ path: '/other', name: 'about', component: Other }) - 方式二: 通过 **
removeRoute**方法,传入路由的名称1
router.removeRoute('about')
- 方式三: 通过 addRoute 方法的返回值回调
1
2const removeRoute1 = router.addRouter(route1)
removeRoute1()
- 方式一: 添加一个相同 name 的路由
- 路由的其他方法补充
- router.hasRoute(): 检查路由是否存在
- router.getRoutes(): 获取一个包含所有路由记录的数组
路由导航守卫
vue-router 提供的导航守卫主要用来通过跳转或取消的方式守卫导航
全局的前置守卫
beforeEach是在导航触发时会被回调的:参数
- to:即将进入的路由Route对象
- from:即将离开的路由Route对象
返回值
- false:取消当前导航
- 不返回或者undefined:进行默认导航
- 返回一个路由地址:
- 可以是一个string类型的路径
- 可以是一个对象,对象中包含path、query、params等信息
可选的第三个参数:next
- 在Vue2中我们是通过next函数来决定如何进行跳转的
- 但是在Vue3中我们是通过返回值来控制的,不再推荐使用next函数,这是因为开发中很容易调用多次next
比如我们完成一个功能,只有登录后才能看到其他页面
1
2
3
4
5
6
7
8router.beforeEach( (to, from) => {
if(to.path !== '/login'){
const token = window.localStorage.getItem('token')
if(!token){
return '/login'
}
}
})完整的导航解析流程图:
- 导航被触发。
- 在失活的组件里调用beforeRouteLeave守卫。
- 调用全局的beforeEach守卫。
- 在重用的组件里调用beforeRouteUpdate守卫(2.2+)。
- 在路由配置里调用beforeEnter。
- 解析异步路由组件。
- 在被激活的组件里调用beforeRouteEnter。
- 调用全局的beforeResolve守卫(2.5+)。
- 导航被确认。
- 调用全局的afterEach钩子。
- 触发DOM 更新。
- 调用beforeRouteEnter守卫中传给 next 的回调函数,创建好的组件实例会作为回调函数的参数传入。
Vuex
什么是状态管理
- 在开发中,我们会的应用程序需要处理各种各样的数据,这些数据需要保存在我们应用程序中的某一个位置,对于这些数据的管理我们就称之为是 状态管理。
- 在前面我们是如何管理自己的状态呢?
- 在Vue开发中,我们使用组件化的开发方式
- 而在组件中我们定义data或者在setup中返回使用的数据,这些数据我们称之为state
- 在模块template中我们可以使用这些数据,模块最终会被渲染成DOM,我们称之为View
- 在模块中我们会产生一些行为事件,处理这些行为事件时,有可能会修改state,这些行为事件我们称之为actions

复杂的状态管理
- JavaScript开发的应用程序,已经变得越来越复杂了
- JavaScript需要管理的状态越来越多,越来越复杂
- 这些状态包括服务器返回的数据、缓存数据、用户操作产生的数据等等
- 也包括一些UI的状态,比如某些元素是否被选中,是否显示加载动效,当前分页
- 当我们的应用遇到 多个组件共享状态 时,单向数据流的简洁性很容易被破坏:
- 多个视图依赖于同一状态
- 来自不同视图的行为需要变更同一状态
- 我们是否可以通过组件数据的传递来完成呢
- 对于一些简单的状态,确实可以通过props的传递或者Provide的方式来共享状态
- 但是对于复杂的状态管理来说,显然单纯通过传递和共享的方式是不足以解决问题的,比如兄弟组件如何共享数据呢
Vuex的状态管理
- 管理不断变化的state本身是非常困难的:
- 状态之间相互会存在依赖,一个状态的变化会引起另一个状态的变化,View页面也有可能会引起状态的变化
- 当应用程序复杂时,state在什么时候,因为什么原因而发生了变化,发生了怎么样的变化,会变得非常难以控制和追踪
- 因此,我们是否可以考虑将组件的内部状态抽离出来,以一个全局单例的方式来管理呢?
- 在这种模式下,我们的组件树构成了一个巨大的“试图View”
- 不管在树的哪个位置,任何组件都能获取状态或者触发行为
- 通过定义和隔离状态管理中的各个概念,并通过强制性的规则来维护视图和状态间的独立性,我们的代码边会变得更加结构化和易于维护、跟踪
- 这就是Vuex背后的基本思想
state
基本使用
1 | import { useStore } from 'vuex' |
mapState
- 在setup中如果我们单个获取装是非常简单的, 通过useStore拿到store后去获取某个状态即可
- 但使用
...mapState(['count', 'price'])获取到的是函数,不能直接使用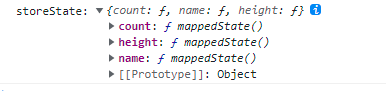
- 默认情况下,Vuex并没有提供非常方便的使用mapState的方式,这里我们进行了一个函数的封装(来自 coderwhy )
1
2
3
4
5
6
7
8
9
10
11
12
13
14
15
16
17
18
19
20
21
22// useState封装思路
import { computed } from 'vue'
import { mapState, useStore } from 'vuex'
export function useState (mapper) {
// 拿到store对象
const store = useStore()
// 获取到对应的对象的function: { name: function, age: function }
const storeStateFns = mapState(mapper)
// 对数据进行转换
const storeState = {}
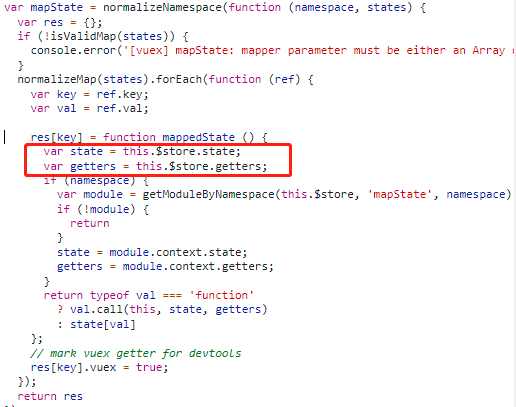
Object.keys(storeStateFns).forEach( fnKey => {
// mapState返回的各个函数 内部也是用的 this.$store.state.XXX 取值,
// 但是setup内 this => undefined
// 要用 bind 把 当前mapState返回的各个函数 的this 指向 store
const fn = storeStateFns[fnKey].bind({$store: store})
storeState[fnKey] = computed(fn)
})
return storeState
}
1
2
3
4
5
6
7
8
9
10
11
12
13
14import { useState } from '../hooks/useState'
setup(){
const storeState = useState(['count', 'name', 'height'])
const storeState2 = useState({
sCount: state => state.count,
sName: state => state.name,
sHeight: state => state.height
})
return {
...storeState,
...storeState2
}
}
getters
基本使用
- getters 可以接收第二个参数,第二个参数是getters 自身,可以获取其他getters属性
1
2
3
4
5
6getters: {
totalPrice(state, getters) {
/* 函数体 */
return res
}
} - getters中还可以返回一个函数,在使用时调用这个函数,也可传递自定义参数
1
2
3
4
5
6
7
8getters: {
totalPrice(state, getters){
return (param) => {
/* 函数体 */
return res
}
}
}
mapGetters
和state同理
Mutation
基本使用
1 | store.commit('add') |
mapMutation
1 | setup(){ |
Actions
基本使用
- Action类似于mutation,不同在于:
- Action提交的是mutation,而不是直接变更状态
- Action可以包含任意异步操作
- 这里有一个非常重要的参数
context:- context是一个和store实例均有相同方法和属性的context对象
- 所以我们可以从其中获取到commit方法来提交一个mutation,或者通过context.state和context.getters来获取state 和getters
1
2
3store.dispatch('add')
store.dispatch('add', {a: 1, b: 2})
store.dispatch({ type: 'add', a: 1, b: 2 })
mapActions
1 | setup(){ |
actions的异步操作
- Action 通常是异步的,那么如何知道action 什么时候结束呢?
- 我们可以通过让action返回Promise,在Promise的then中来处理完成后的操作
1
2
3
4
5
6
7
8
9
10
11
12
13
14
15
16
17actions: {
add(context, payload){
return new Promise( (resolve, reject) => {
this.$http('/').then( res => {
context.commit('increment')
resolve( res )
})
})
}
}
// 使用
const store = useStore()
const increment = () => {
store.dispatch('add').then( res => {
console.log(res)
})
}
- 我们可以通过让action返回Promise,在Promise的then中来处理完成后的操作
module
基本使用
- 由于使用单一状态树,应用的所有状态会集中到一个比较大的对象,当应用变得非常复杂时,store 对象就有可能变得相当臃肿
- 为了解决以上问题,Vuex允许我们将store 分割成模块(module)
- 每个模块拥有自己的state、mutation、action、getter、甚至是嵌套子模块
- 对于模块内部的mutation 和getter,接收的第一个参数是 模块的局部状态对象
1
2
3
4
5
6
7
8
9
10
11
12
13
14
15
16
17
18
19
20
21const moduleA = {
state: () => {},
mutations: {},
actions: {},
getters: {}
}
const moduleB = {
state: () => {},
mutations: {},
actions: {},
}
const store = createStore({
modules: {
a: moduleA,
b: moduleB
}
})
store.state.a // -> moduleA的状态
store.state.b // -> moduleB的状态
module的命名空间
- 默认情况下,模块内部的action和mutation仍然是注册在 全局的命名空间 中的
- 这样使得多个模块能够对同一个action 或mutation 作出响应
- Getter 同样也默认注册在全局命名空间
- 如果我们希望模块具有更高的封装度和复用性,可以添加
namespaced: true的方式使其成为带命名空间的模块- 当模块被注册后,它的所有getter、action 及mutation 都会自动根据模块注册的路径调整命名
1
2
3
4
5
6
7
8
9
10
11
12
13
14
15
16
17
18
19
20
21
22
23
24
25
26
27
28
29
30
31
32
33
34
35const a = {
namespaced: true,
// 组件内使用时: $store.state.user.xxx
state(){
return {
name: '张三',
age: 18
}
},
mutations: {
// 组件内使用时: $store.commit('user/changeName')
changeName(state) {
state.name = 'TT'
}
},
getters: {
// 组件内使用时: $store.getters["user/info"]
info(state, getters, rootState, rootGetters){}
},
actions: {
changeNameAction({commit, dispatch, state, rootState , getters, rootGetters}){
commit('changeName')
// module修改或派发根组件
// 在 actions 中修改 root 中的state
commit('changeRootName', null, { root: true })
dispatch('changeRootNameAction', null, { root: true })
}
}
}
const store = createStore({
modules: {
user: a,
}
})
- 当模块被注册后,它的所有getter、action 及mutation 都会自动根据模块注册的路径调整命名
module的辅助函数
- 方式一:通过完整的模块空间名称来查找
1
2
3
4
5
6
7
8
9
10
11
12
13
14
15setup(){
const store = useStore()
const homeCount = computed(state => store.state.home.homeCount)
const doubleHomeCount = computed(getters => store.getters['home/doubleHomeCount'])
const increment = () => { store.commit('home/increment') }
const incrementAction = () => { store.dispatch('home/incrementAction') }
return {
homeCount,
doubleHomeCount,
increment,
incrementAction,
}
} - 方式二:第一个参数传入模块空间名称, 后面写上要使用的属性
1
2
3
4
5
6
7
8
9
10setup(){
const mutations = mapMutations('home', ['increment'])
const actions = mapActions('home', ['incrementAction'])
return {
mutations,
actions
}
} - 方式三:**
createNamespacedHelpers**1
2
3
4
5
6
7
8
9
10
11
12
13
14
15
16
17
18setup(){
const { mapState, mapGetters, mapMutations, mapActions } = createNamespacedHelpers("home")
const state = useState(["rootCounter"])
const rootGetters = useGetters(["doubleRootCount"])
const getters = useGetters("home", ["doubleHomeCount"])
const mutations = mapMutations(["increment"])
const actions = mapActions(["incrementAction"])
return {
...state,
...getters,
...rootGetters
...mutations,
...actions
}
}
state、getters 的封装完善
1 | /************** 公共部分:useMapper.js *******************/ |